 |
WISTERIA PROJECT – Shibaraku no ouyou (Shibaraku Patterns). | |||||
[From Hometown Temari Vol 2, pp.12 & 143 by Ozaki, Chiyoko] | |||||
With this temari design my two current projects intersect as it shows two variations (applications) of the Shibaraku pattern, but it is also used in the curriculum to demonstrate the Hitohudegake technique (Section 21). | |||||
 |
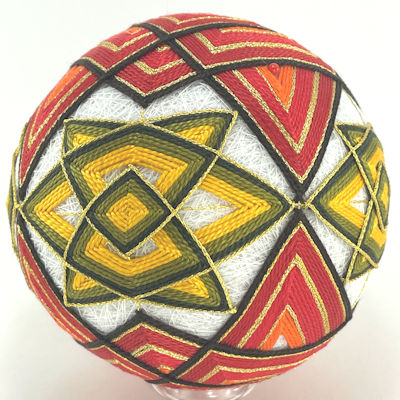
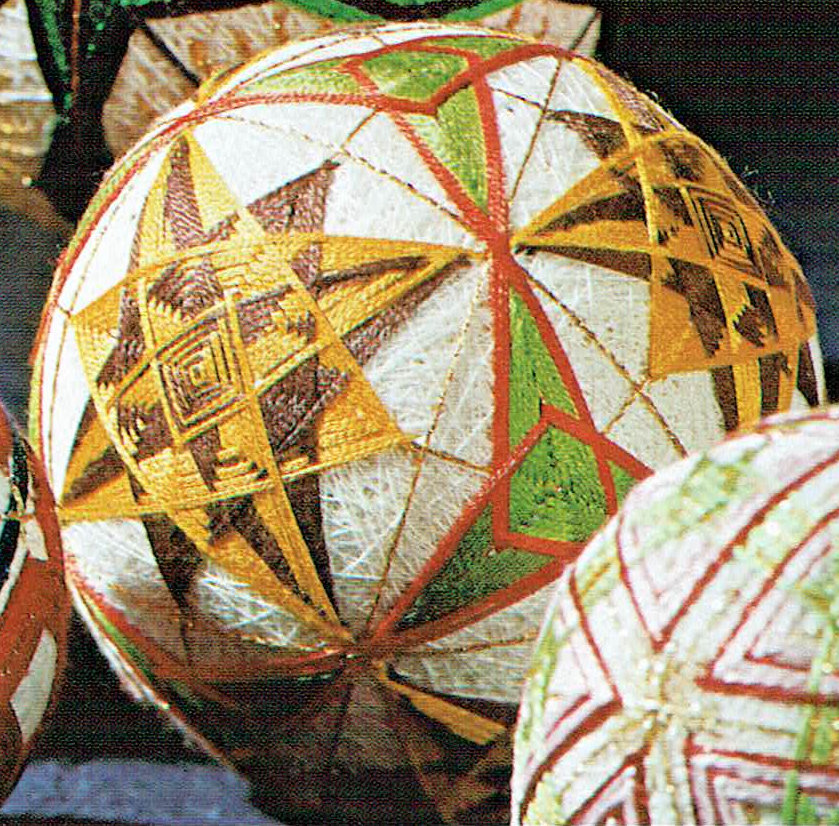
The design is stitched on a Combination 8 division and has two large Shibaraku patterns at the poles. The centres of the motifs
are open and the outer points reach the equator. Around the equator at the other four 8-part centres are four smaller Shibaraku
motifs that lie on their sides, as it were, with their middle points much longer than the outer points stretching between the outer
points of the larger motifs.
| ||||
I’m staying fairly close to the colour scheme in the photograph and to the respective thicknesses of the colour bands.
The guidelines and the gold in the stitching is Coronet Braid (4-strand for the guidelines and 8-strand for the stitching).
Otherwise the stitching is in DMC No. 5. The large motifs use Orange – bright, Red - bright, Coral Red – very dark and Black Brown.
The smaller ones use Canary – deep, Olive Green and Avocado Green – black.
| |||||
 |
The large motifs were stitched with the inner points 3mm from the centres (but they all closed up anyway leaving just the gold peering through), the outer points just over the guidelines, and the middle points 0.9cm (roughly ¾ of the way along the short guidelines inside the square’s border. I made it this distance as I was concerned that there wouldn’t be sufficient space for the equatorial motifs. This was a mistake as the equator motifs now can’t reach the middle points of the large motifs. Perhaps I should have started the middle points just over the guidelines like the outer points (as it is in all the diagrams!) – or perhaps just inside the guidelines. I need to make some measurements now I’ve finished. | ||||
Otherwise, the main motifs were gorgeous and beautifully red. For the small motifs I started the inner points at the centre and the middle points roughly 2/3rds of the distance from the 8-part centre along the equator. This was roughly 1.25cm from the 4-part centres on the equator. The outer points I stitched a little shorter (1cm) as I was measuring from the edge of the large motifs. … |
 |
||||
Having measured the finished temari, I estimate that moving the start of the middle points on the large motifs to 4 - 5mm inside
of the square’s borders would get the middle points of the large motifs to touch the edges of the small equatorial motifs.
| |||||
SHIHAN STUDY - Woven Arrow-feather Pattern Obi (SH02). | |||||
[From Cosmo 5 p.15 by Ozaki, Chiyoko] | |||||
Again, an exercise in kousa, this time using jyouge douji and shitagake chidori, stitching a row at a
time. I’m using the same size stitching thread, but DMC, and tangerine and dark plum instead of yellow-green and green.
I changed the colours because after some calculation I realised I was going to need more that one skein of each colour,
and this was the most suitable combination of light and dark colours.
| |||||
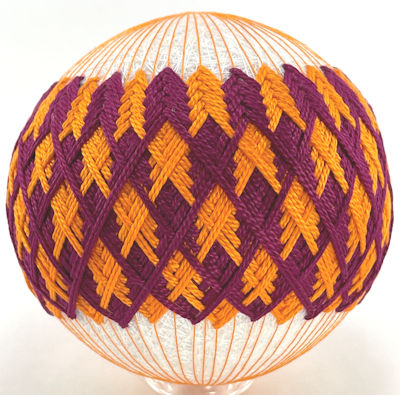 |
The stitching has gone well and the points dropped the required amount with 5 rounds of stitching. And it looks identical to the temari in the photograph in the book, so either the instructions are wrong, or my translation / understanding of them is at fault. | ||||
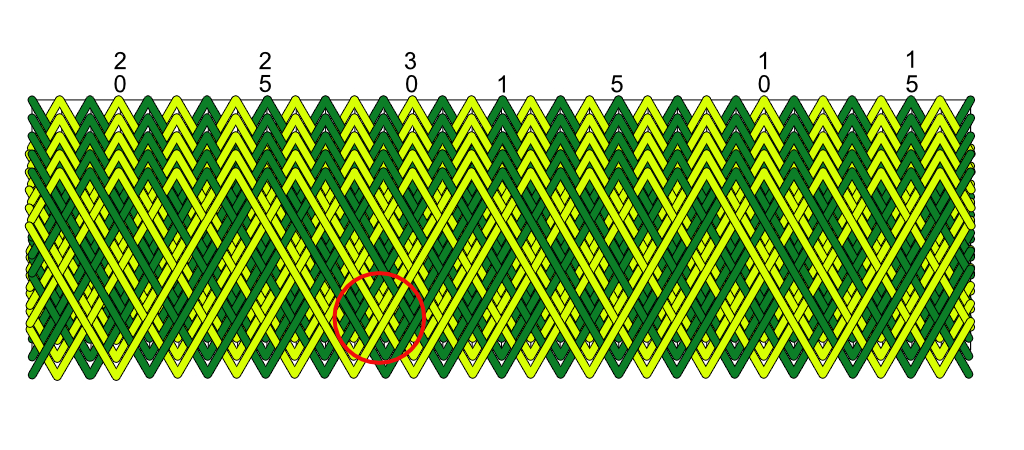
So, finally I decided to diagram both situations. The first diagram shows how the stitches would have looked using the book's instructions, stitching the first dark green guuideline, and then the next clockwise yellow-green guideline, followed by the next dark green guideline and progressing clockwise, alternating the colour with each guideline. As you can see in the red circled area, the sides of the arrow-feather pattern are irregular and do not match. | |||||
 | |||||
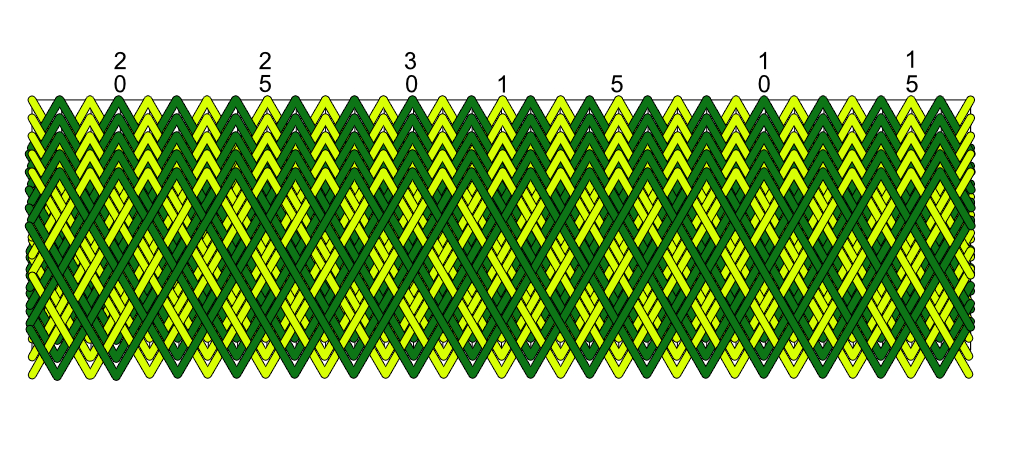
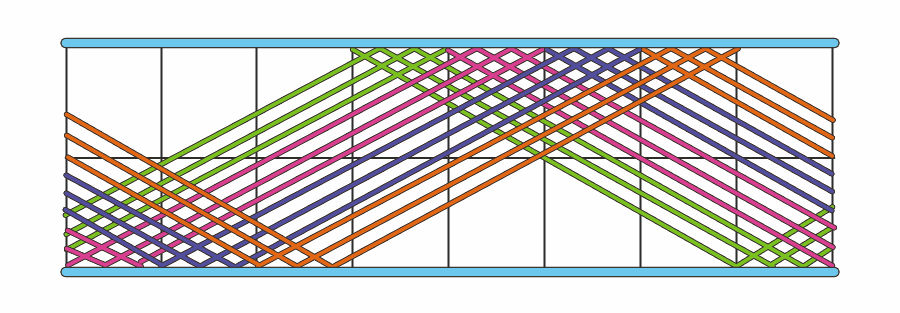
The second diagram shows how I stitched the design, starting with the yellow-green guidelines, stitched clockwise in sequence, and then the dark green guidelines also stitched clockwise in sequence. This has regular arrow-feather patterns with the sides showing the same colour indentations as in the photograph. I rest my case, m'lud. | |||||
 | |||||
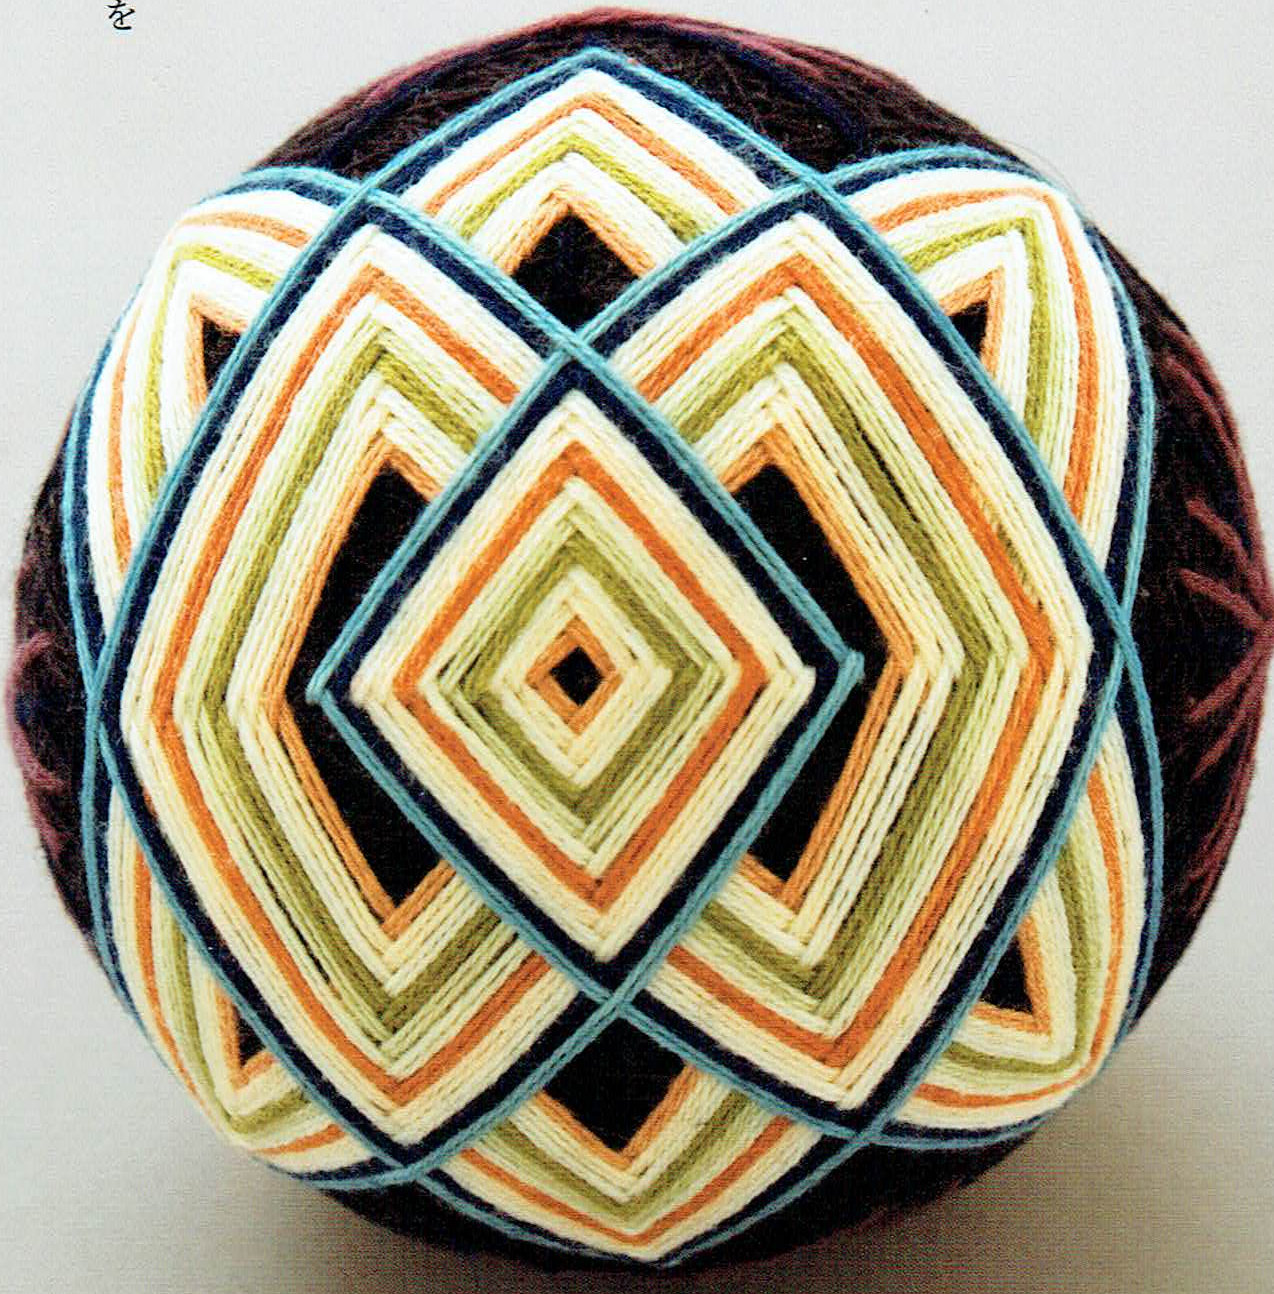
WISTERIA PROJECT – Aoi Bara (Azure Roses). | |||||
[From Kii Temari by Hisayama, Yukio & Takimoto, Hiroko
p.19] | |||||
I’m going to stick closely-ish to the instructions in the book as I can’t quite see what this design is going to look like.
I’m starting with the 23cm white mari specified and the general colour scheme, but I’m using 2/8 Tencel rather than the No.
25 used in the book. Assuming my thread gauge chart is correct, I just have to divide by two to get the number of rows to
stitch. The colour scheme is quite complex and not the smooth gradation I thought it would be. I’m staying with the blue as
the main colour - turquoise and 5 graded tints – but I’m going to substitute golden yellow for the yellow green specified.
| |||||
 |
|||||
I need to ensure that this sequence is maintained in both the A and B ‘bara’ sections of the design, as some colour
sections have an odd number of rows which would throw the sequence out. I’m going to use numbered pins on the jiwari
to help navigate as well as writing out and marking off all the path sequences as I stitch them.
| |||||
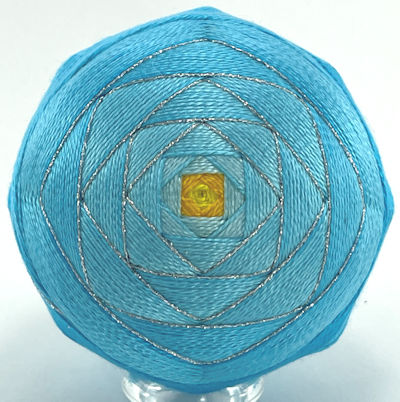 |
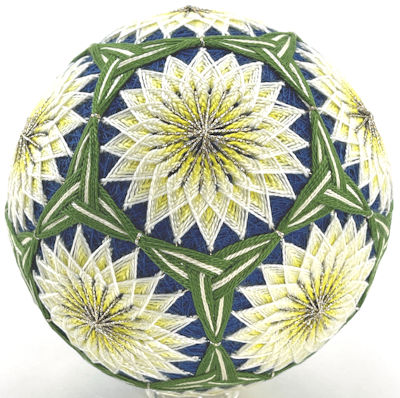
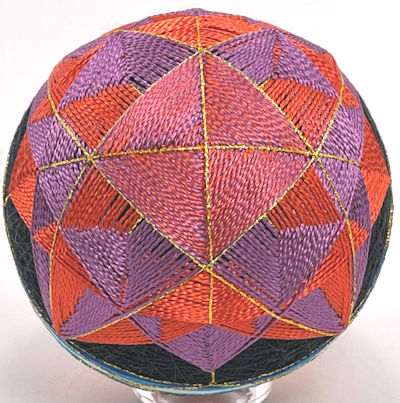
So, finished. And the two bara-style squares at the poles are very beautiful – although I still don’t understand why
the colour scheme changes the gradations in the way it does, and I did change it a bit so it seemed more logical in its
progression. The result is rather gorgeous and the turquoise is a lovely colour. Maintaining the order of stitching the
two sequences made the bara squares look very neat.
| ||||
When the stitching of the design is complete, as no more rows can be added due to the intersecting threads at the equator, the edge of the ‘octagon’ that is created is fairly smooth and so this off-kilter wrapped obi can be wrapped close up to the edge of the offset squares. (I should have evened up the angles at which the ‘A’ and ‘B’ threads were crossing as this would have made the edges smoother.) It was a lot more successful that I thought it would be, but the bulky equator-crossing threads disturbed the symmetry and the thread placement across them. If the legs had been the same and the crossings smoother, the obi would have turned out much better. | |||||
 |
|||||
The easiest way to wrap it was to place pins in the crossing bundles at the ¼ points and laid the first section (between two jiwari)
through these pins which I gradually moved or discarded as I wrapped the section. The following sections then seemed to wrap more
easily. Also helpful was keeping track of the top and bottom positions were the thread changed direction to ensure that they stayed
on opposite sides of the ball as it was wrapped.
| |||||
SHIHAN STUDY - The Cedars of Mount Tategawa (SH01). | |||||
[From Cosmo 3 p. 42 by Ozaki, Chiyoko] | |||||
So, off we go again on he JTA path to another certificate. The first temari in the list (section 1 – black) is the Cedars of Mount Tateyama, which appears to an exercise in kousa on a simple 8 division. Mount Tateyama in Toyama prefecture is one of the three holy mountains of Japan, and the cedars, Japanese Cedars (Cryptomeria japonica) not our Western Red Cedars (Thuja plicata) that surround my house, are the national tree of Japan and are commonly planted around temples and shrines. They can be truly impressive in their size and age. | 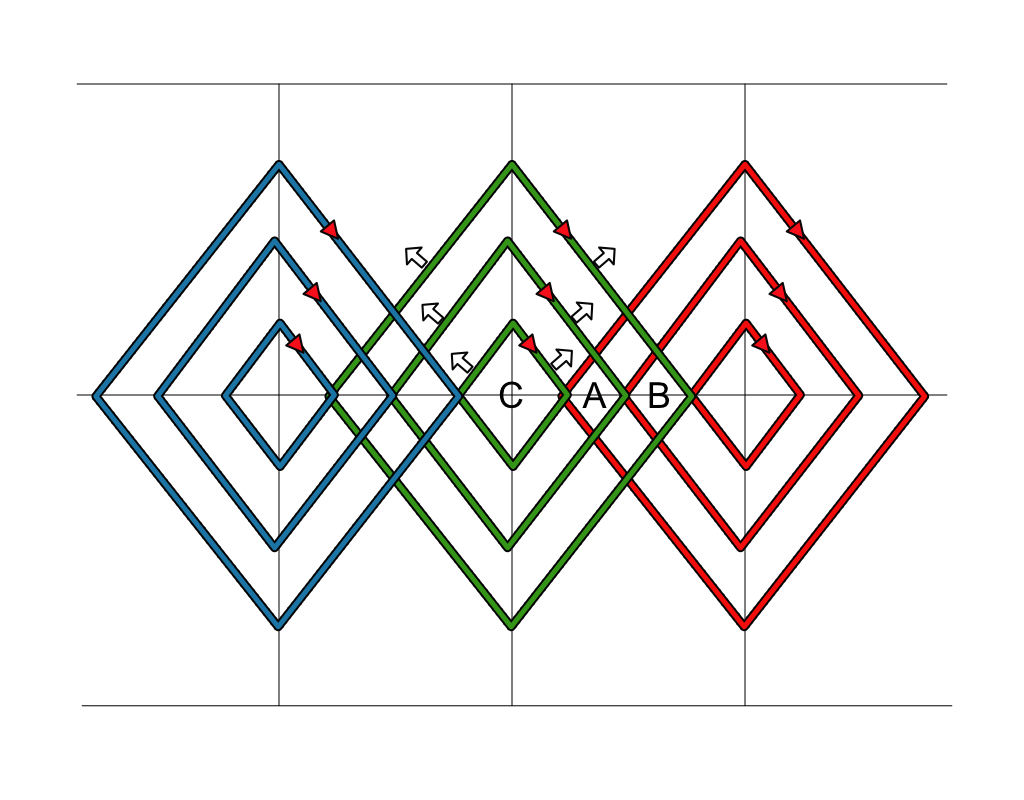 |
The temari design is of diamonds, three inset diamonds on each guideline, layering with the neighbouring diamonds.
[Note. I must remember to layer the sixth diamond that’s stitched under the first to maintain symmetry.]
|
|||
If this looks good when I’ve finished, I could try it again with the greens from Palette 45, and more diamonds or sections, or both.
| |||||
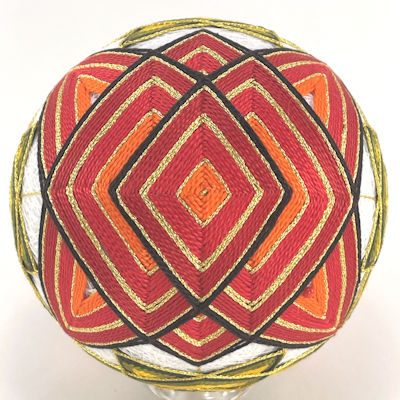
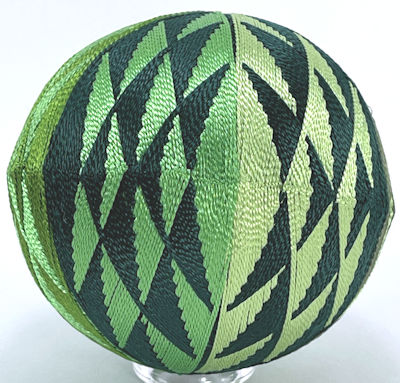 |
In the end I added an extra row of stitching around the outer diamonds and they’ve filled in the gaps quite well. On reflection, if I were to redo this design I would use a double-stranded thread as then the stitches along the equator would have been fewer and further apart. This would have made the stitching over the previous diamonds’ threads at the equator a lot easier with the holes further apart and this would have also made it easier to keep the over-stitched equator lines straight. Also, I would consider working the outer diamonds first and from the poles inward so that the threads fill along the guidelines all the way to the poles. This would require a lot of weaving in and out of the threads of the inner and middle diamonds, but I think it would be worth the effort. I could also play with the colour scheme. This is a dark – light – dark – light colour scheme, but a gradation might be quite attractive (a – b – c – d – c – c – (a)), or perhaps just two alternating colours? | ||||
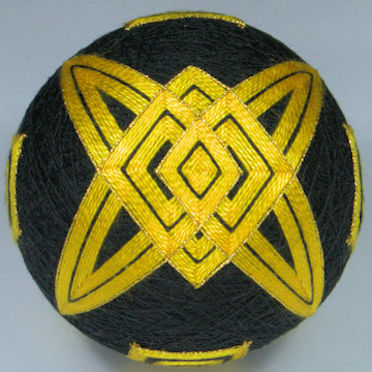
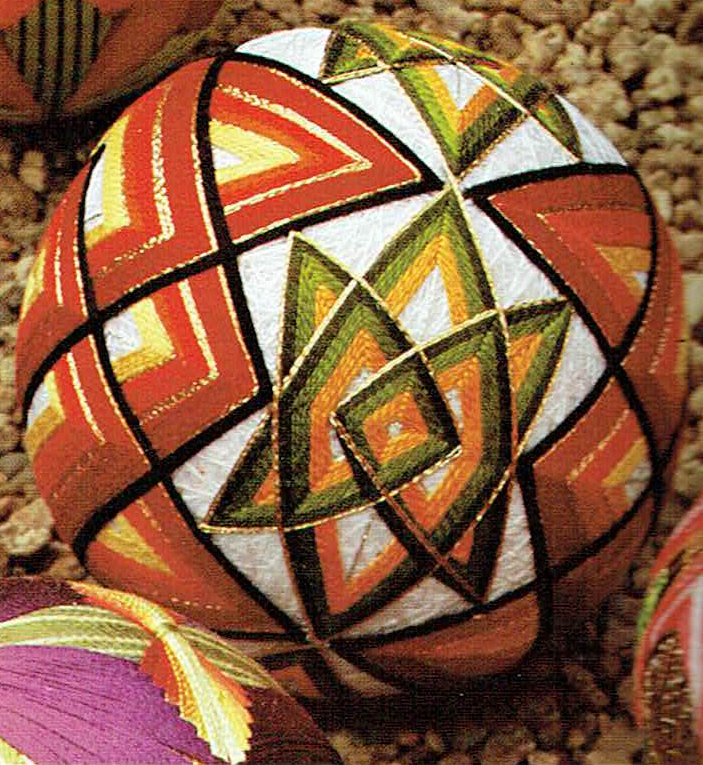
WISTERIA PROJECT – Hana kenbishi. | |||||
[Based on Hometown Temari Vol. 1 p.68 by Ozaki,
Chiyoko] | |||||
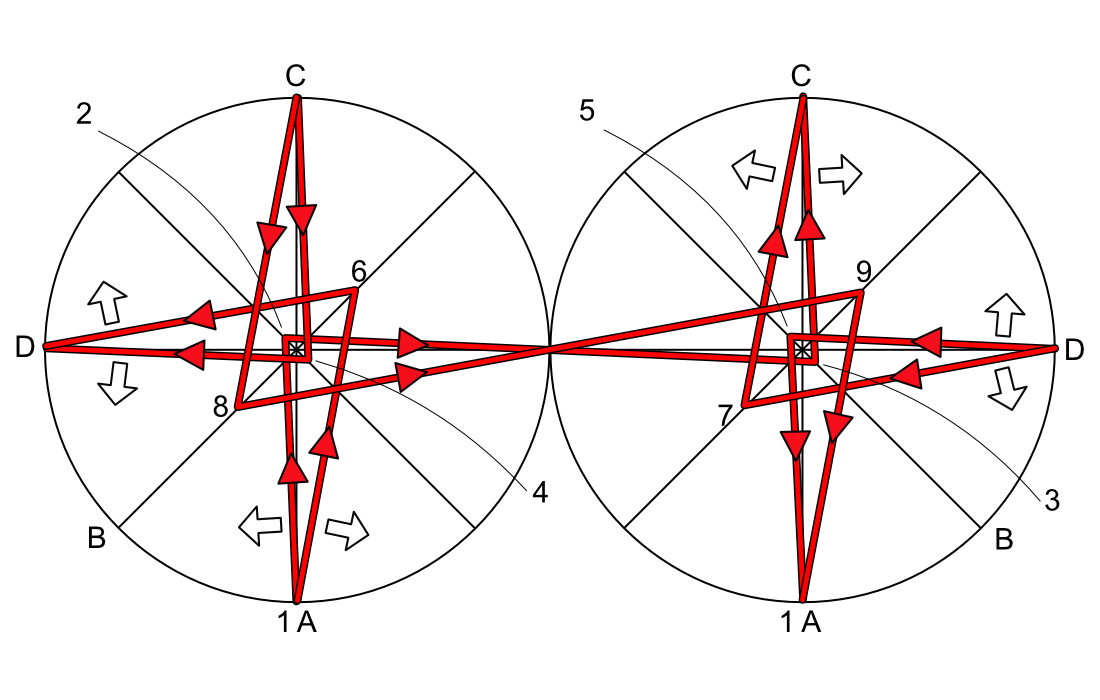
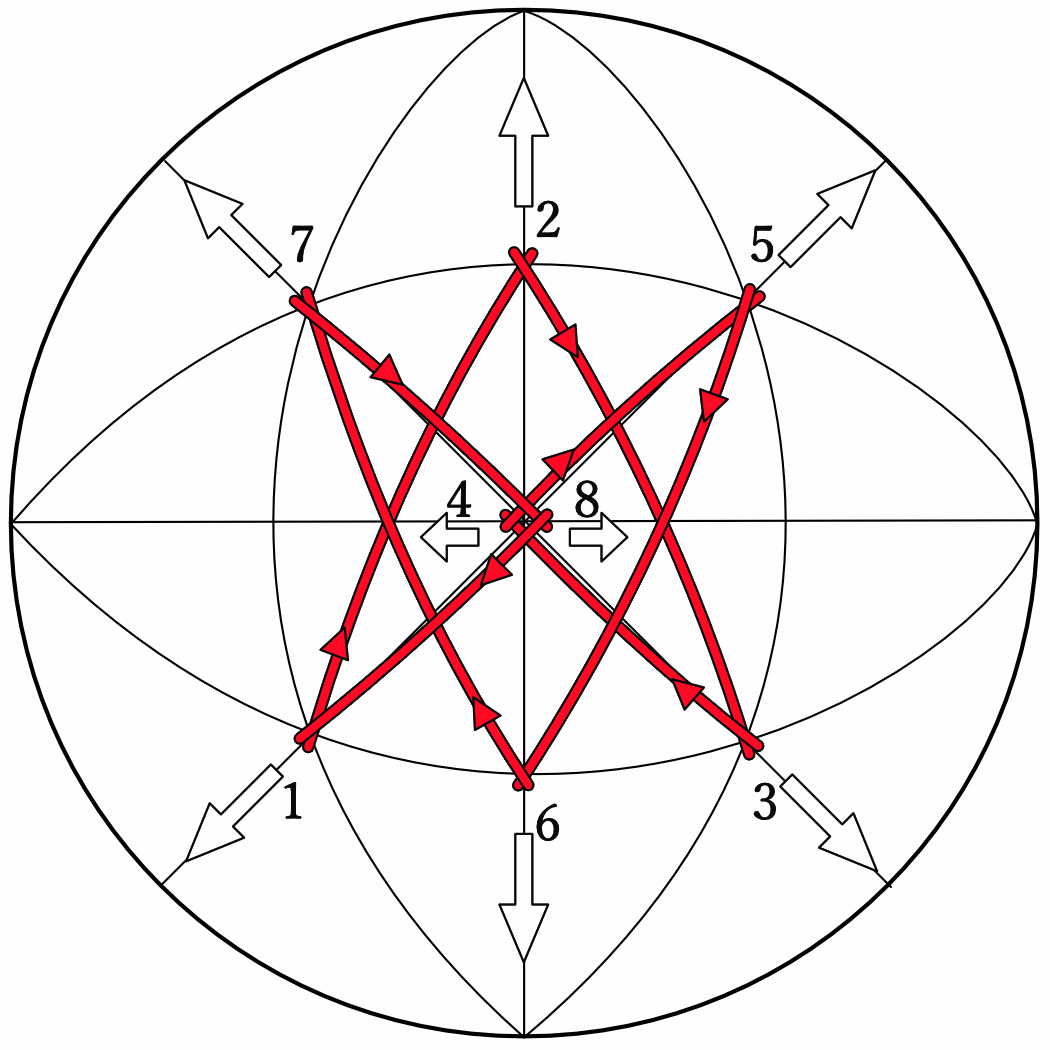
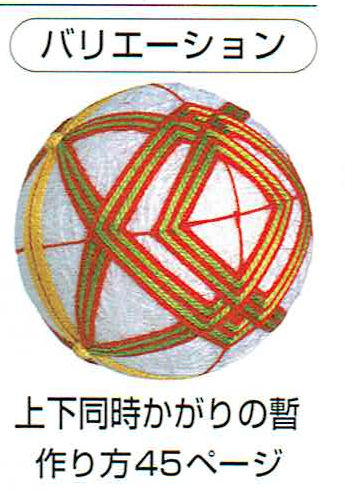
Although the three examples I could find of this reflected / rotated design are all stitched on a Combination 8 division, I’m going to keep things simple and quick by using a Simple 8 division and stitching just two designs at either pole, with an obi wrapped around the equator separating them. The only set of instructions are in Hometown Temari Vol. 1, and this has the start of the long outer points halfway along the long jiwari at the 8-part centres. I tried this but after a little experimenting I found that starting all the outer points (all 8) a little further from the centre at the 3/5ths position would give a nice design and result in the longer outer points reaching the obi’s edge as the inner square is completely filled. Once the inner square is filled, that is, the stitching thread has reached the intersection of the threads at the base of the shorter, mono-coloured, points, the stitching is complete as no further rows can be added. | |||||
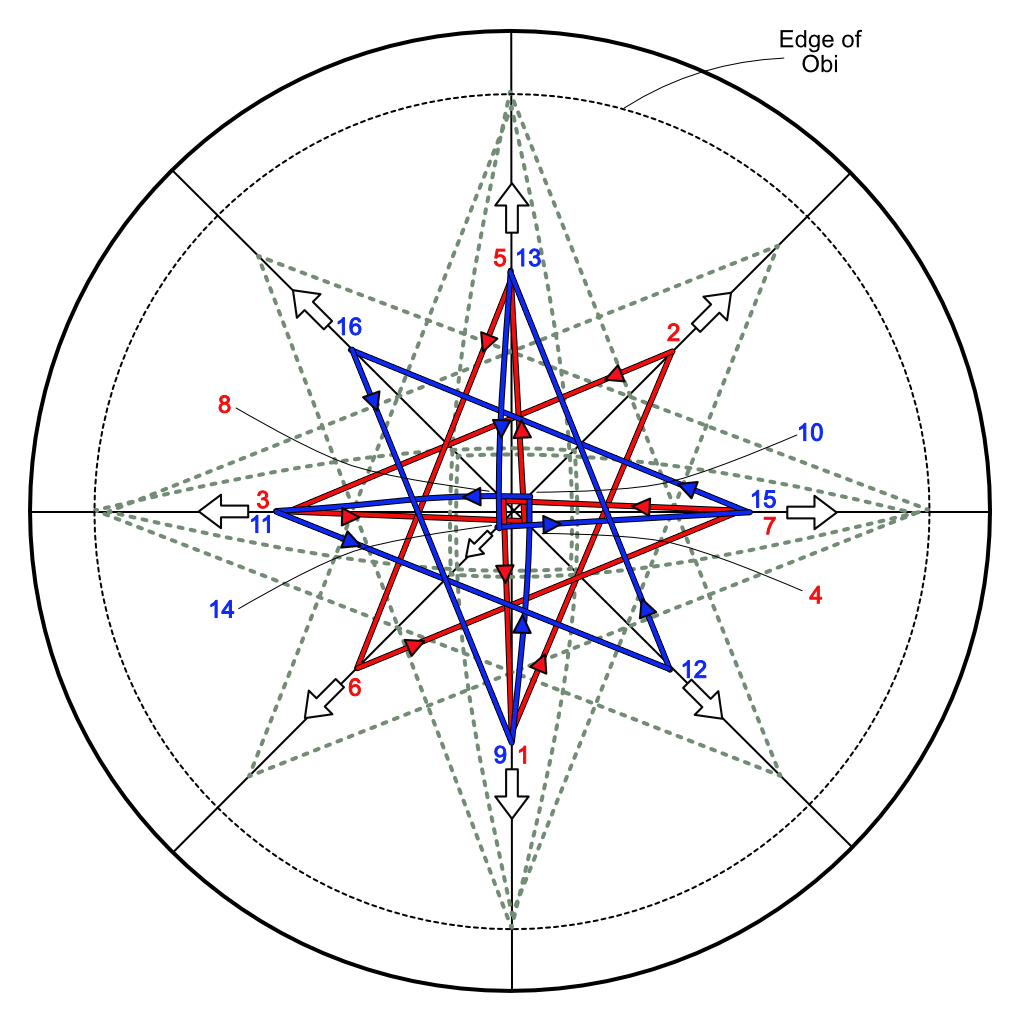 |
Although I have added numbers to indicate the direction of stitching, it will be easiest to start the stitching at one of the mono-coloured shorter points (e.g. point 2). | ||||
I’m using a black-wrapped 25cm. mari and I’m using Treasure Braid Petite in plain Gold as the jiwari thread. For stitching
I’m using Miyako thread which may be a tad fine for this design as thicker threads seem to show off the inner square better,
but I’m trying for a more harmonious whole while still having some contrast, hence the use of a finer thread. I’m stitching
the bi-coloured North Pole with orange and red-violet and the South Pole with a pink gradation in four tints, progressing from
dark to light thread. And perhaps a final row of gold to both designs. I’ve chosen to stitch the obi in blues for a bit of
contrast: a light centre to a dark exterior in three grades of blue, with gold edging and double chidori guard.
| |||||
 |
Although I have added numbers to indicate the direction of stitching, it will be easiest to start the stitching at one of the mono-coloured shorter points (e.g. point 2).I have just finished the first motif at the North Pole and I used 15 rows of each colour thread, 30 rows in total, to get the square to the intersection of the threads and filled in the spaces of the points. I finished the design off with some gold thread to highlight the central square, but also to hold down and position some of the threads. Spindle stitches outline the square, and two matsuba stitches run along the square’s diagonals and holds down threads on the short points. | ||||
I think that I could have started the motif a little closer to the centre without adding any more rows. This would give
the points a bit more space and the stitching, especially at the end, would be easier. So, I’ll try this with the next design at the South Pole.
| |||||
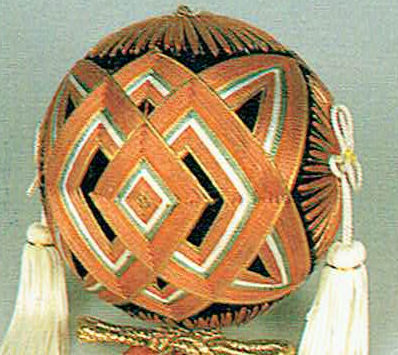
And here it is. I again added some gold thread at the end but just spindle stitches to frame the central square. I like the gradation design more than the bi-coloured design, and if I repeat this it will be on a C8 division, so that the design will be smaller and thus squarer and also I would like to stitch a mono-colour gradation. | 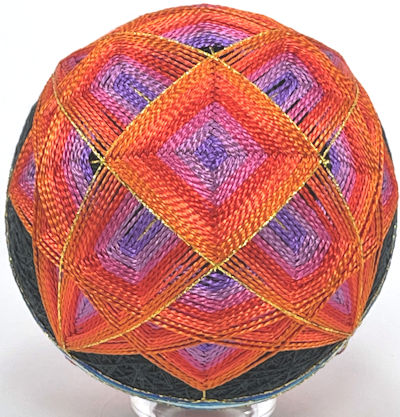 |
||||
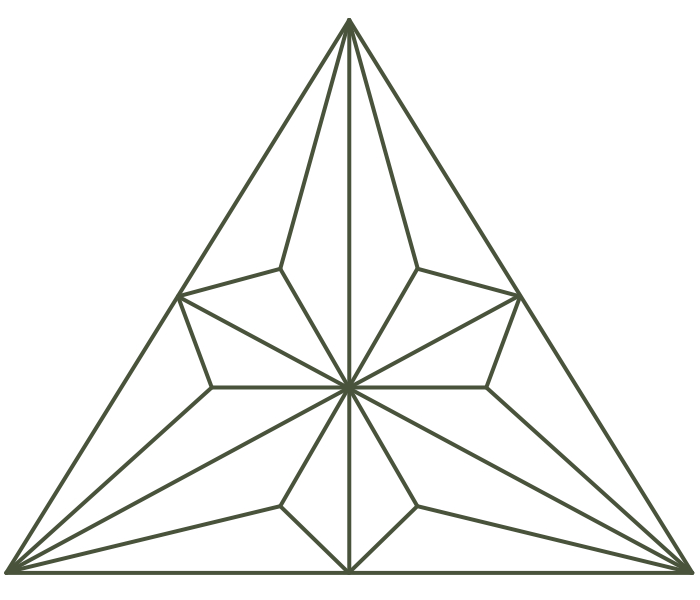
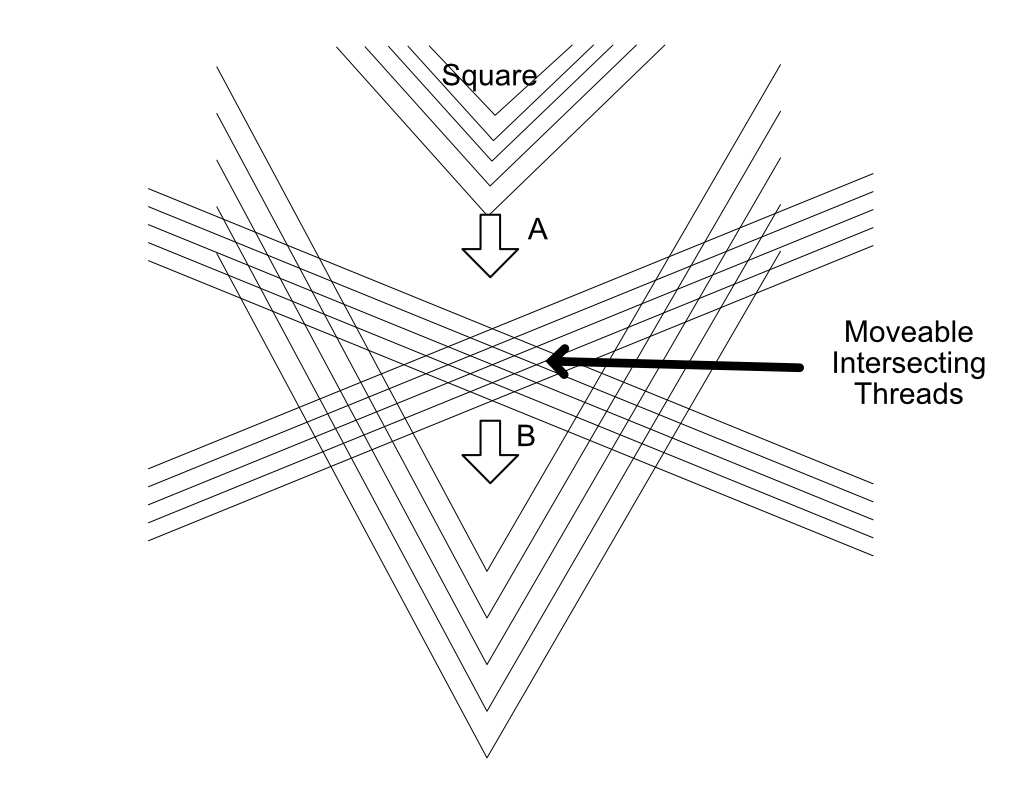 |
This design is a balancing act between filling the square – stitching and filling the ‘A’ gap in the diagram – and having sufficient room for the long points without cramming them in. This is aided by the movability of the intersecting crossing threads, which also have to be wide enough to fill the ‘B’ gap. | ||||
Next Up: Aoi Bara | |||||
WISTERIA PROJECT – The Designs. | |||||
25th March 2025 | |||||
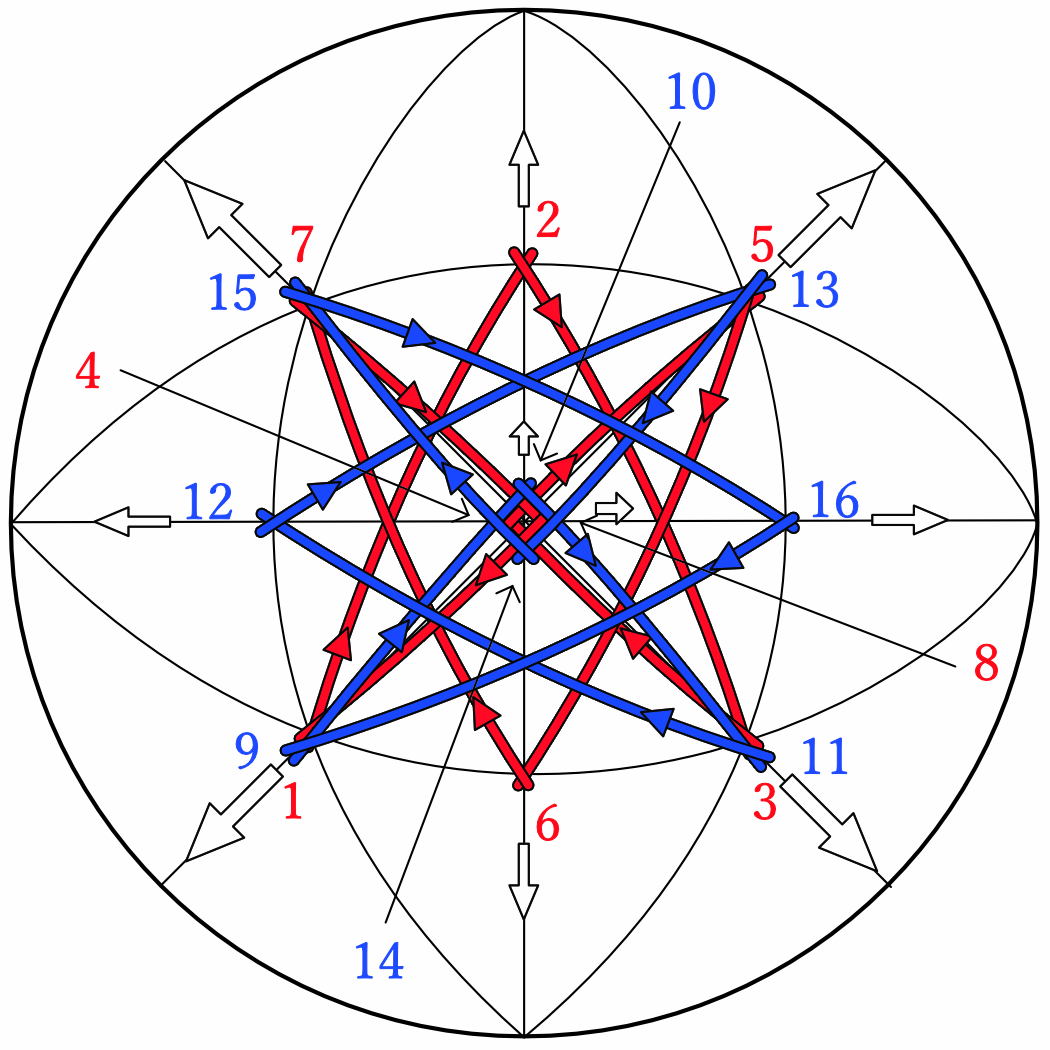
There are 13 ‘Shibaraku’ designs that I can find in the Japanese books. Of all these designs, ‘Aoi Bara’ is unique in the way in which the motif is repeated ‘bara’ style, offsetting the motif by 45 degrees. It should be noted that the ‘reflected’ variation can also be considered as ‘bara’ style as the second motif is offset by 90 degrees. It’s also one of the few that is stitched on an S8, not C8, division, although this division is common to most of the designs in which the stitches cross the equator. This is definitely one of the temari I’ll be stitching although the instructions miss out where the ‘middle’ points (6,7,8 and 9 on he previous diagram) are positioned on the jiwari (about a third along?). I’m also intrigued to find out how the obi fits in between (or over?) the ‘Shibaraku’ stitches. So, I’ll put this design to one side while I consider the other twelve. | |||||
 |
There are two different variations: nine of what I’ll call the standard design, and three of the reflected, or rotated,
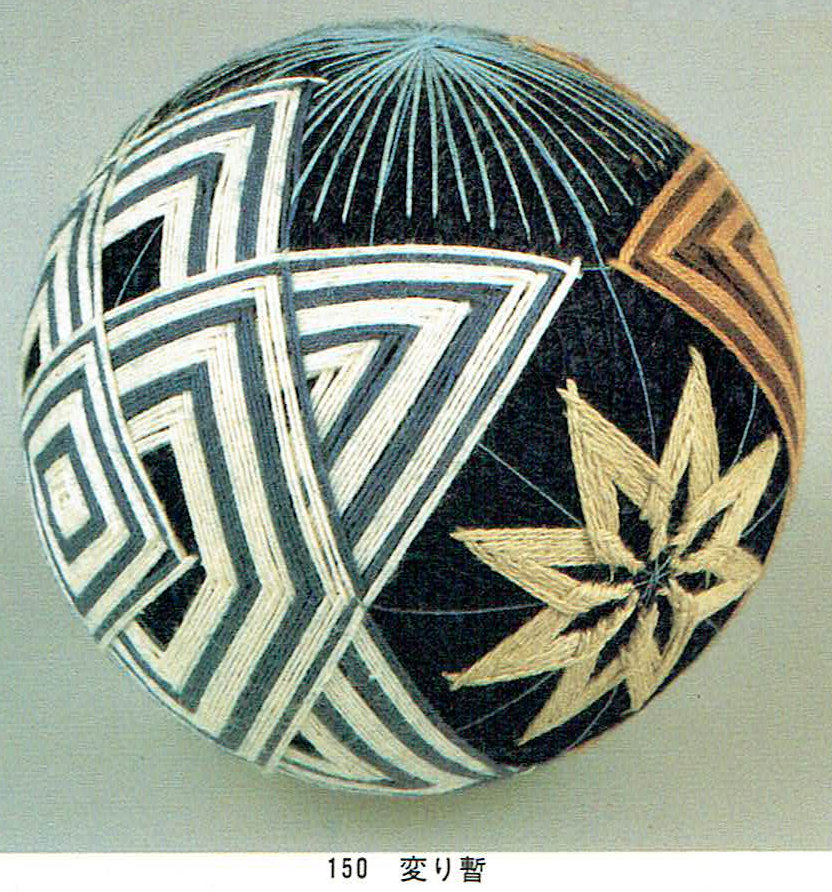
variation. The standard design is exemplified by the temari in Furosato no Temari Nos. 5 and 150. In these temari the six
points of the motif are the same length, roughly, and all end close to the equator of the C8 division mari so that there are
only 2 designs on the ball at the poles. The design is constrained by the number of rows that can be fitted into the space
between the centre stitches (4 & 8) and the thread intersections on the same short guidelines as the centre stitches.
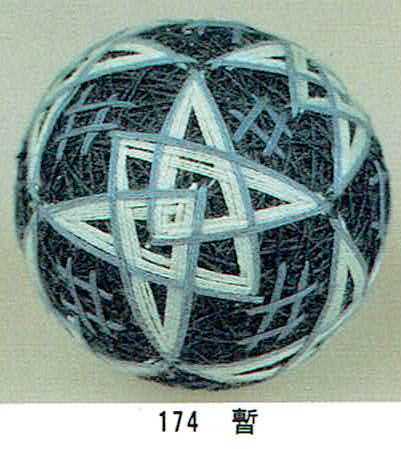
Temari for 12 Months Vol 2, p.10, Hometown Temari Vol 2, p.12, and Sanuki (2016) p.26 are all very similar and vary only
in their degree of fullness. Only one of the temari confines the design to the 8-part squares of the C8 (Furosato no temari No.174).
| ||||
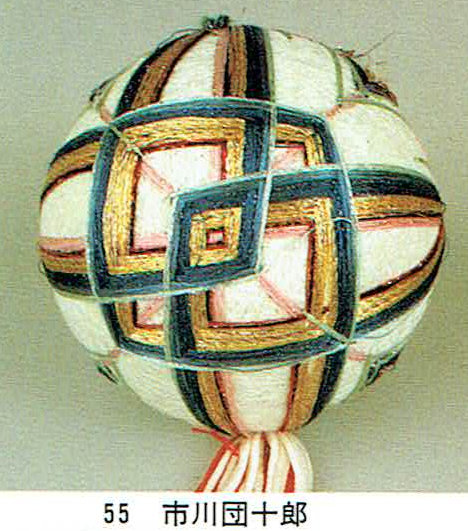
The other three temari, plus the design around the equator of Hometown Temari Vol 2 p.12, have points at different lengths. My first ‘Shibaraku’ from Cosmo 3 has short middle points (2 & 6) whereas the motif around the equator of Hometown Temari Vol 2 has much longer middle points that are stitched on the equator. The remaining two, stitched on simple divisions, are the temari in Fun with Temari, p.32 and, Furosato no Temari, No. 55. The odd points (1,3,5 & 7) cross the equator: in the former the poles are connected ‘jyouge douji’ style at the equator whereas in No.55 the two designs at the poles are offset by 45 degrees and the points start at the equator so that the designs overlap. | |||||
 |
And then there is the reflected version of the design in Dream Temari p.36, Kii Temari p.19, and Hometown Temari Vol. 1, p.9. These designs are very similar (Dream and Hometown are almost identical) and differ only in their support elements. | ||||
So, before experimenting with these designs, I’m going to stitch some of these examples. I’ll start with ‘Hana Kenbishi’ but
rather than a C8, I’ll stitch it on an S8 so I need only stitch two designs. At one pole I’ll have a 2 colour design, and the
other a single graded colour (with an obi in-between). ‘Aoi Bara’ I’ll repeat, but with a thicker thread to make the work quicker.
And, then I’ll work a standard design, perhaps the one from Hometown Temare Vol 2. Once I’ve got the hang of this hitohudegake
design with these three, I’ll consider what else might be done with it, such as: | |||||
WISTERIA PROJECT – Introduction. | |||||
17th March 2025 | |||||
When a new temari book arrives, I always mark the pages that have temari that I’m attracted to by colour, design,
cleverness in technique, etc… (with archival stickers, not a Sharpie). The temari I really like I copy and put in
my ‘Future Projects’ file. And, if I really, really like the temari it will become a line on a ‘Temari to Make’ spreadsheet.
| |||||
 |
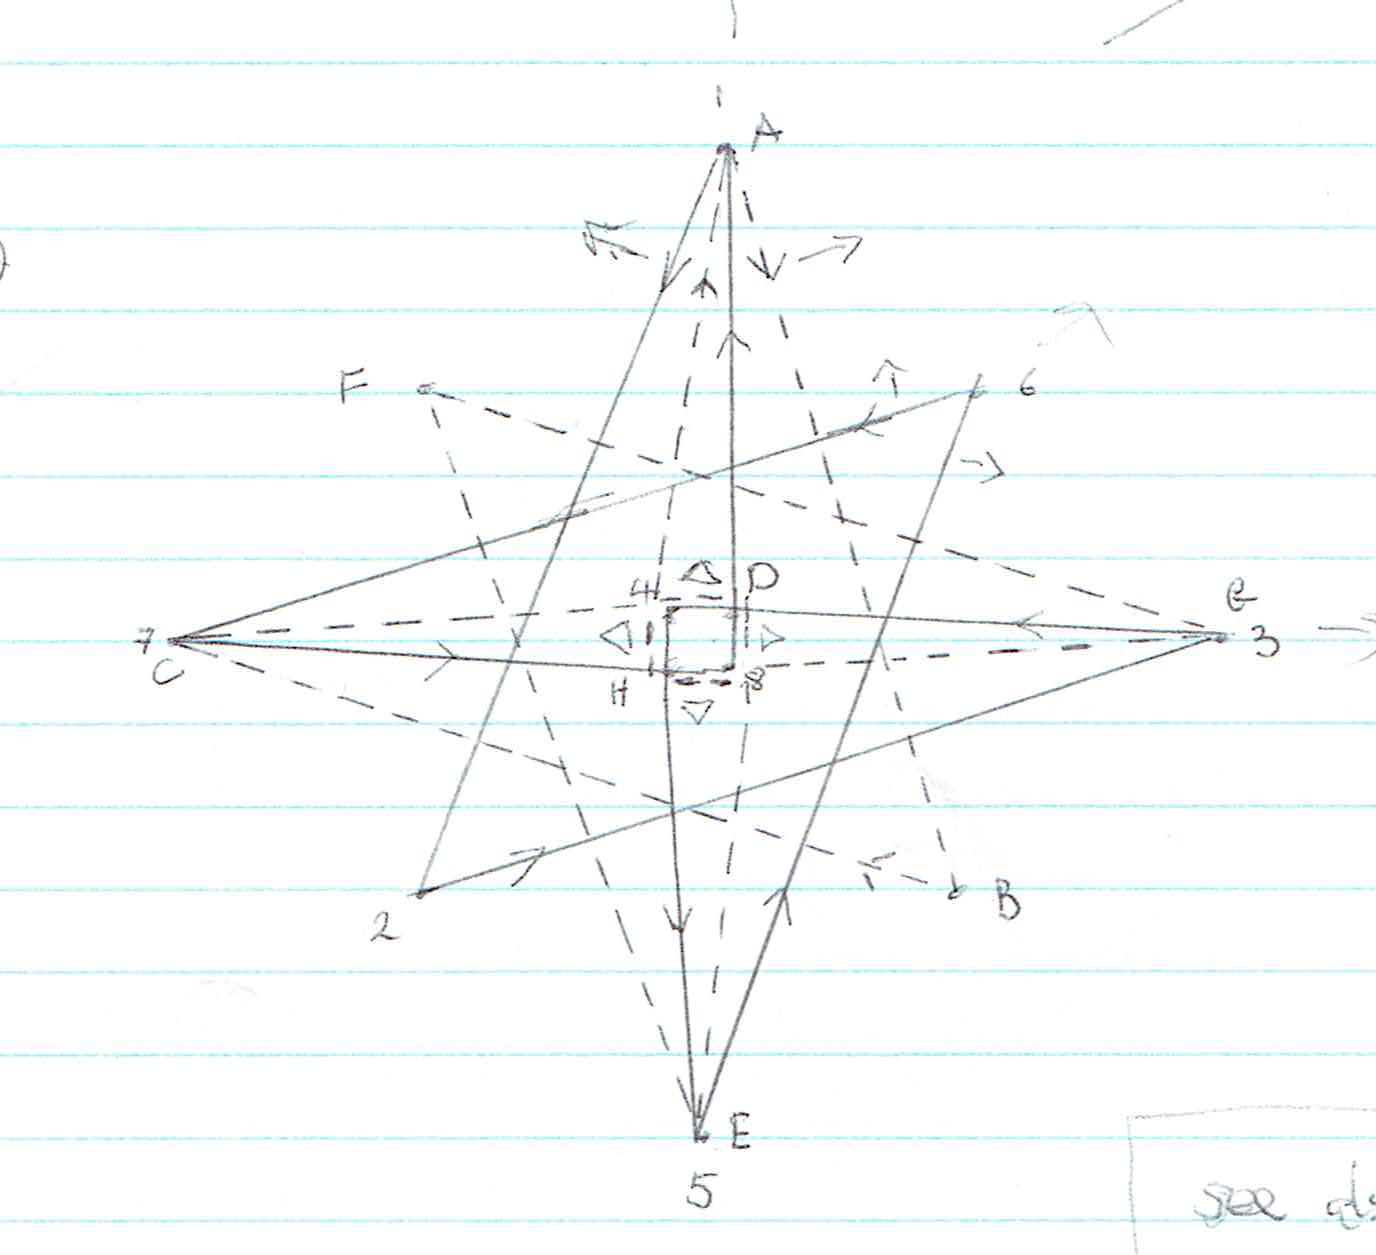
The first, which made it to the 'Future Projects' file, is from Harmony 2, p. 36 and is entitled ‘Hana Kenbishi’ (Diamond Sword Flower). This attracted me because of the unusual Hitohudegake stitching path. I was so intrigued by the design that I sketched out the pathway. |
||||
|
|||||
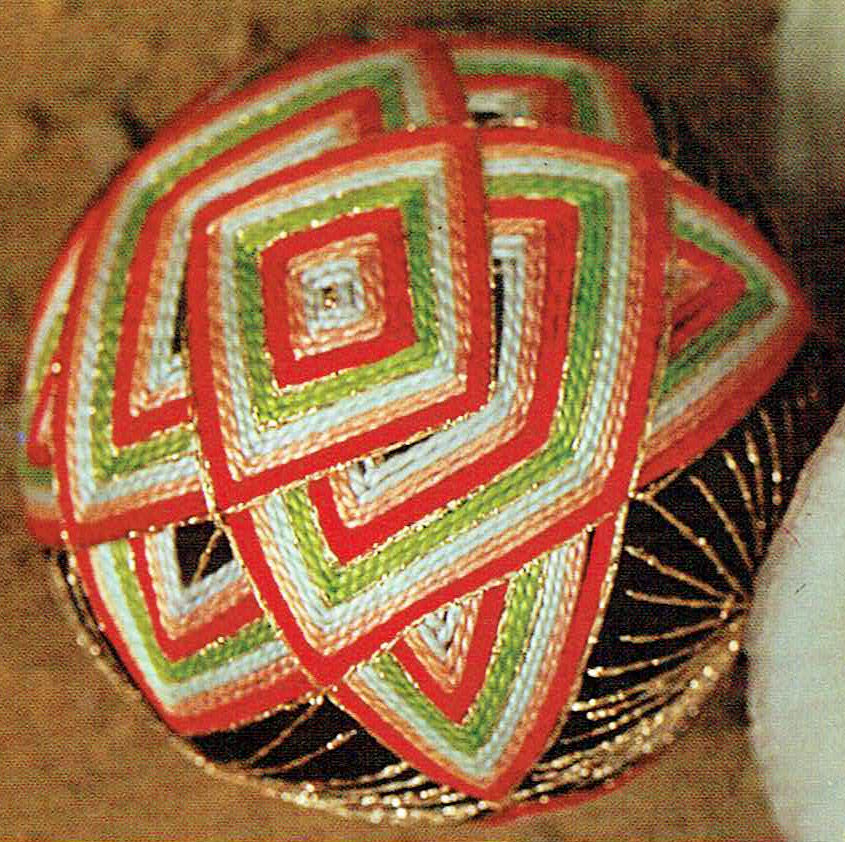
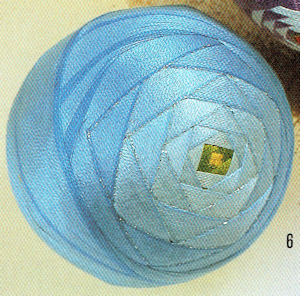 |
The second, which made it all the way to a line on a spreadsheet, is ‘Aoi Bara’ (Blue Roses) from Kii Temari, p.19.
I’ve always liked the result of the ‘bara’ technique
and I particularly liked the way in which the blue was graded in this design.
|
||||
| |||||
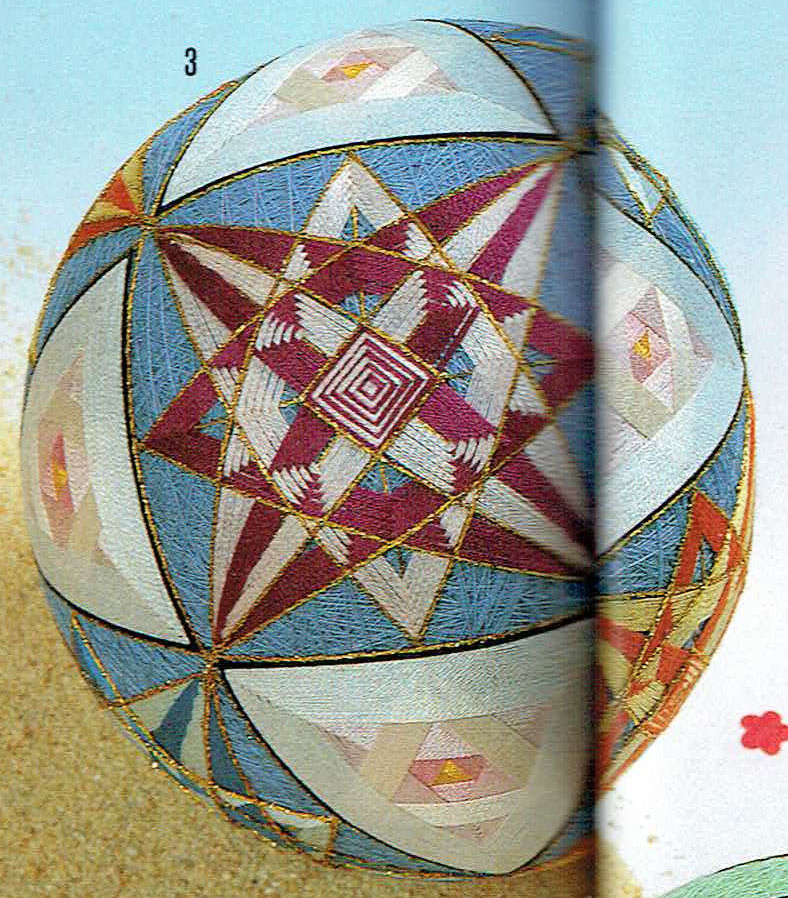 |
And so I thought that this project would be an exploration of these two similar but different designs. It was when I was scanning the photograph of ‘Aoi Bara’ that I noticed that there was a temari very similar to ‘Hana Kenbishi’ in the opposite corner.It is entitled ‘Variation of Shibaraku and Rose Triangles’ from Kii Temari, p. 19 |
||||
So these temari are all variations of ‘Variation of Shibaraku’, one of the first temari I made, and the first I made from the photograph alone as there were no instructions given in Cosmo 3. |
 |
||||
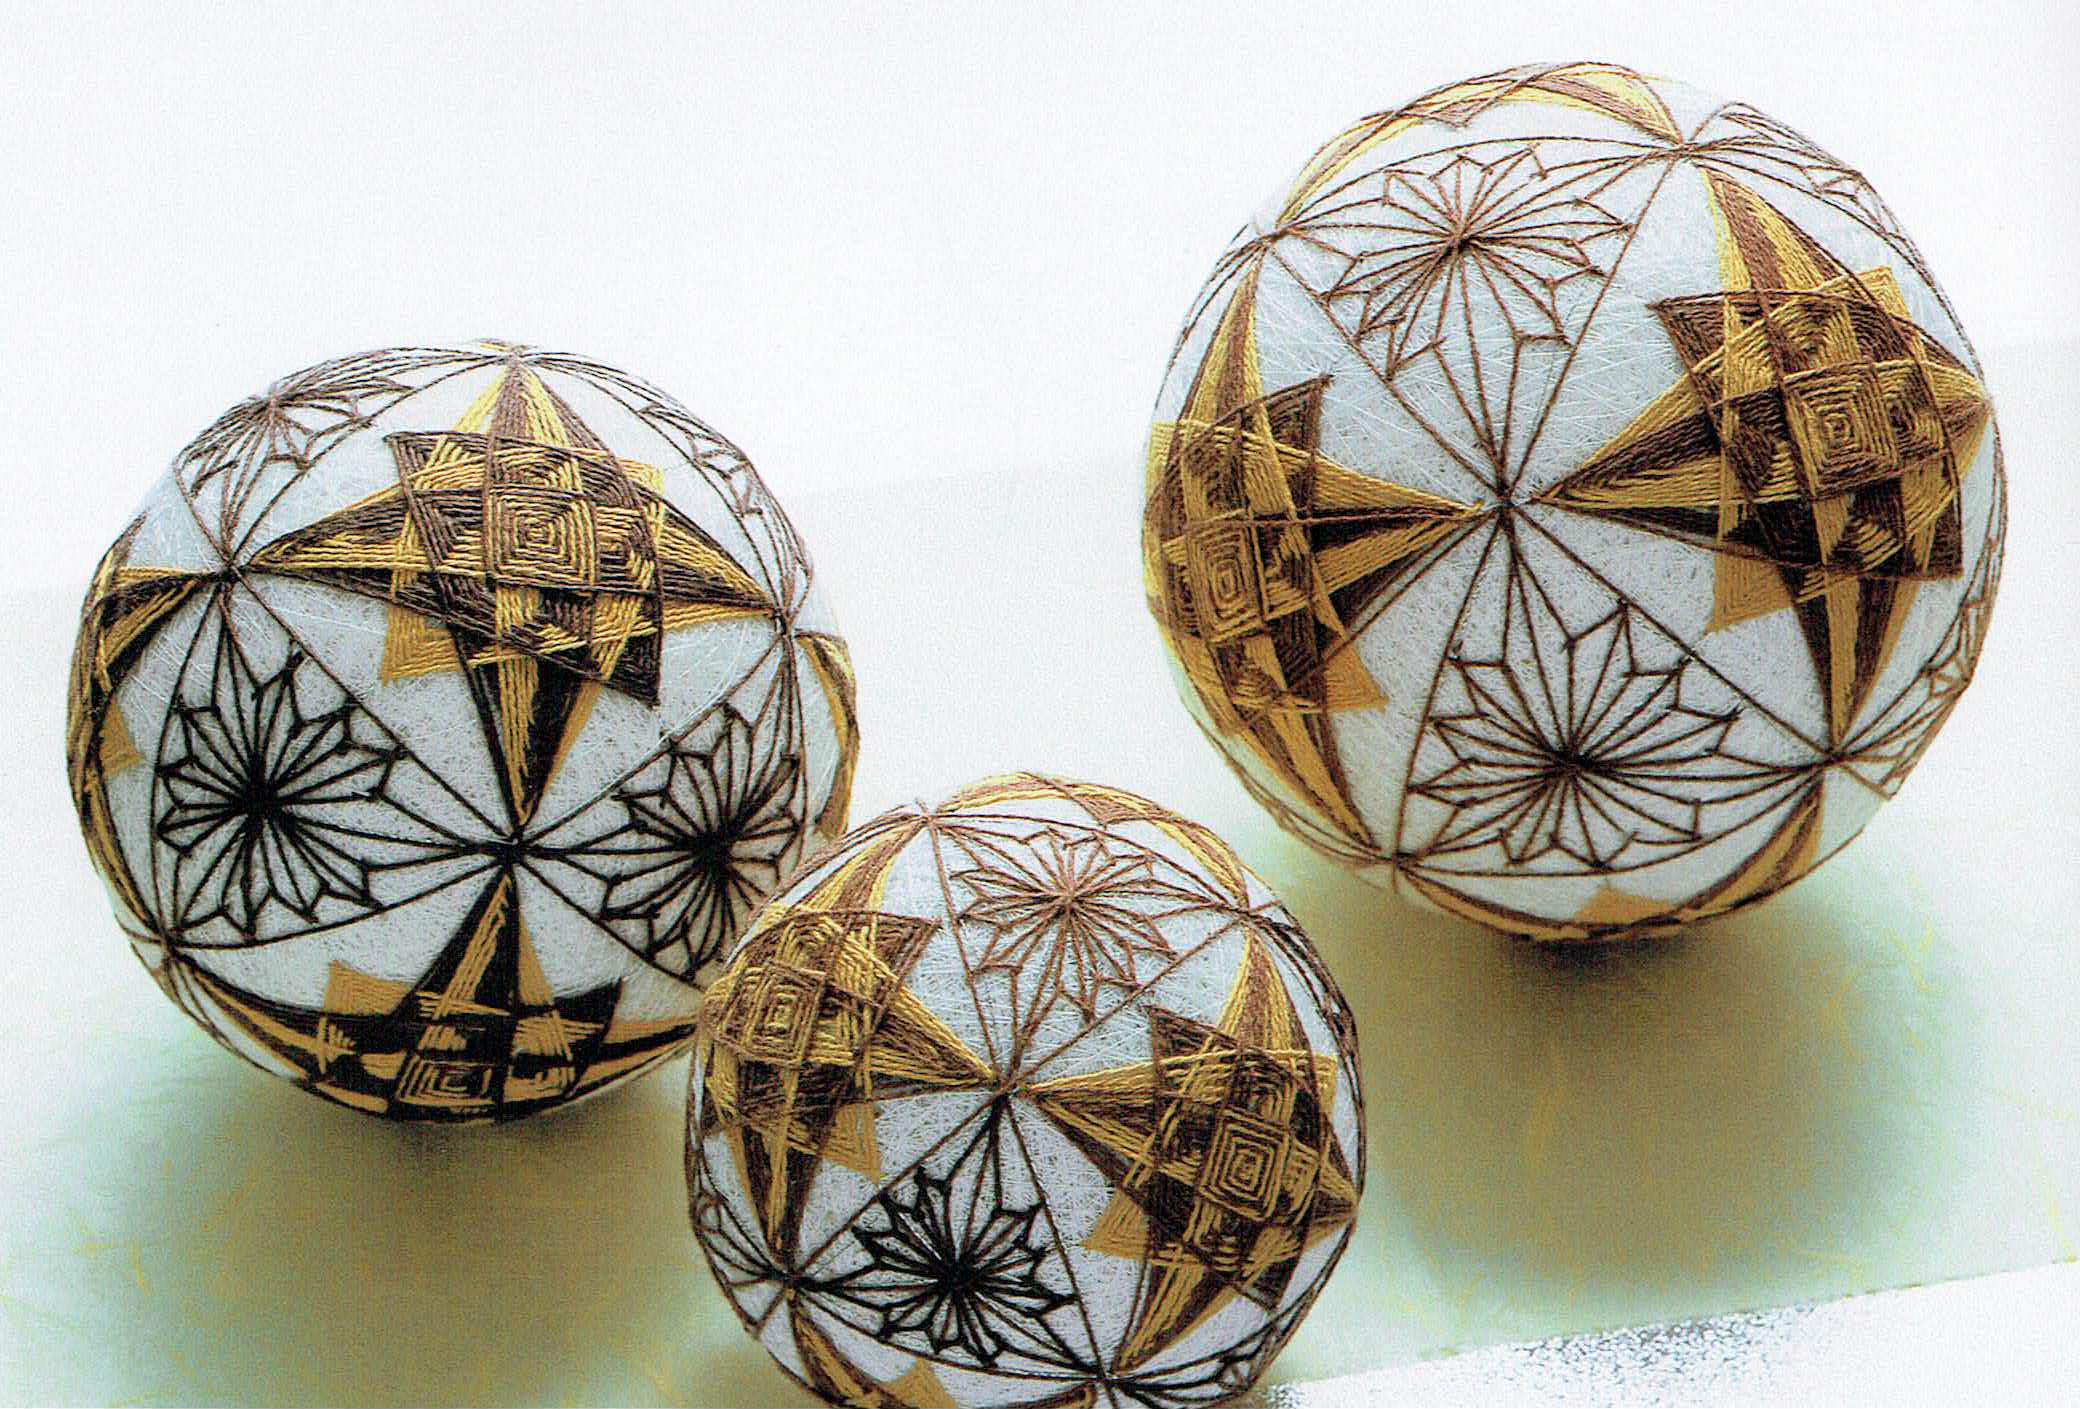
When I was stitching this temari, I studied the design by comparing it with others that I found in the books, and wrote a set of notes with diagrams. So I’ll end this piece with photographs of all the temari with this or a similar design from the Japanese books, and in the next piece I’ll compare and contrast them. | |||||
 |
 |
 |
|||
Furosato no Temari No. 5 |
Furosato no Temari No. 55 |
Furosato no Temari No. 150 |
|||
 |
 |
 |
|||
Furosato no Temari No. 174 |
Fun with Temari p. 32 |
Hometown Temari Vol.1 p.9 |
|||
 |
 |
 |
|||
Hometown Temari Vol 2. p. 12 |
Sanuki Temari (2010) p. 26 |
Temari for 12 months Vol 2, p. 10 |
|||